Showing posts with label brick stitch beadwork. Show all posts

Wednesday, July 20, 2011

Old and New Necklace

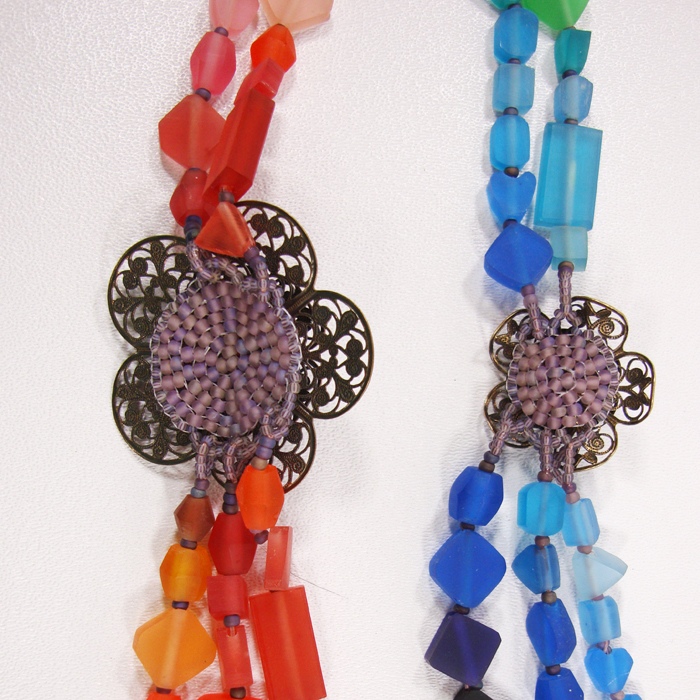
Now that I am back from traveling and teaching, I have completed my old and new element necklace design proposed by Art Beads. The antique brass flowers are imbedded on a brick stitched circle with loops designed to take the strung "new" resin bead elements. I wanted the flowers to stay right side out and not swing to the wrong side as they were being worn. The brick stitched palette with the spaced loops holds the flowers right side out. The resin elements are arranged in a rainbow progression, becoming larger toward the bottom to balance the asymmetrically placed flowers. The beads are strung on Conso, a braided nylon upholstery thread and knotted, gluing the knots. I find that I am just not adept with crimp beads and have never had a Conso necklace come apart. I had to delay stringing the strands of resin beads as I only had gold and silver closures which just didn't match the antiqueness of the flowers. Although I would have preferred a closure with two separate attachment sites, I felt that the brass color was more important and found the antique brass flower toggle gave just the right flavor. Joanne

 Back view of brick stitched supports

Disclosure: The Vintage brass filagree flower pendants were kindly provided free-of-charge by Artbeads.com, within the frames of Artbeads.com blogging program. The author of this blog has not received any payment from above-mentioned company. The post above represents only personal opinion of the blog author.

Friday, May 7, 2010

Seahorse Necklace #3

My Seahorse necklace is complete featuring the lovely resin and sterling pendant by Tania Hartman and boro glass toggle closure provided to me by Artbeads (www.Artbeads.com). The result is an asymmetric design of brick stitched starfish and strung beads in cool aquas and teals with flexible loop in loop hinges. A summer combo. The Seahorse necklace will follow my bluebird necklace into the Potomac Fiberarts Gallery, Studio 18, at the Torpedo Factory Arts Center, 105 N Union Street in Alexandria, VA. Joanne

Disclosure: The Tania Hartman Resin and sterling pendant as well as the boro glass toggle were kindly provided free-of-charge by Artbeads.com, within the frames of Artbeads.com blogging program. The author of this blog has not received any payment from above-mentioned company. The post above represents only personal opinion of the blog author.

Thursday, May 6, 2010

Seahorse Necklace #2

I am continuing to work on the seahorse necklace featuring a seahorse resin on sterling pendant by Tania Hartman provided to me by Art beads (www.Artbeads.com). I have pictured a beadwork starfish in progress. I first establish a ring of five beads and then construct a bead ladder out from each bead one at a time, brick stitching back to the center along one side of the ladder to move on to the next arm. The starfish arms are tapered by varying the size of the beads used.

I also like to incorporate "hinges" in my necklaces. This gives a pivot point that does not stress the thread. Here I have connected separate modules (the starfish) with loop in loop hinges. For more information on this method, look up the back issue of Beadwork magazine: Beadwork.  "Stress Redux:  Send in the Reinforcements!"  by Joanne Strehle Bast, Summer 1998 issue. 


I am also using as a closure the boro glass toggles, also provided by Artbeads. I really like the use of a catch that does not add a distracting metal element into the beadwork. Joanne


Disclosure: The Tania Hartman Resin and sterling pendant and boro glass toggle were kindly provided free-of-charge by Artbeads.com, within the frames of Artbeads.com blogging program. The author of this blog has not received any payment from above-mentioned company. The post above represents only personal opinion of the blog author.


Tuesday, May 4, 2010

"Sleight of Hand" exhibit

 The "Sleight of Hand" deck of cards exhibit closes in Pittsburgh this Saturday May 8. I am going to Pittsburgh for the Saturday afternoon artist's talk and will bring my piece  "Clubbing the Night Away" 6 of clubs home when the exhibit closes at 5PM. I am excited to see all the pieces together and to hear others talk about their work. The exhibit is at the Borrelli-Edwards Gallery listed below. The deck of cards will continue to be on sale at least through he extent of Fiberart International.


Due to Popularity, Sleight of Hand decks are being reprinted and will continue to be available at:

BE Galleries
3583 Butler Street, Lawrenceville, PA 15201
412.687.2606 / begalleries@mac.com
TUE-FRI: 11am - 6pm / SAT: 11am - 5pm
Patricia Boutique
115 Center Avenue, Aspinwall, PA 15215
412.799.0819 / MON-SAT: 10am - 6pm
3g Gallery (Westin Hotel concourse)
1001 Liberty Ave, Pittsburgh, PA 15222
412.288.4320 / M-F: 10am - 6pm
The Quilt Company
3940 Middle Road, Allison Park, PA 15101
412.487.9532 / www.thequiltcompany.com
M & TH: 9:30am - 9pm / TUE, W, F & SAT: 9:30am - 5pm
Also at the Pittsburgh Center for the Arts
and Society for Contemporary Craft
For retail locations or to purchase on-line:
www.fiberartinternational.org


Tuesday, December 29, 2009

FGP#18 Frame continued

Well, Back from a holiday break. We went to visit the granddaughter in Rochester, NY. I did take 2 days off before Christmas to sew a snow white dress.
But now back to the project: First, I photographed the figures on black and gray backgrounds to decide which I liked better. For all but the disco balls, I preferred the gray.


I stitched 2 rows of round #6 seed beads in black and very dark brown around the entire wire frame. I like the depth that close but not identical shades provide. I decided to up the weight of the thread to 10 lb fireline as the bead holes allowed it and I figured, the heavier the better.


After the 2 rows of round beads, I added a row of dark iridescent rectangular beads, followed by a row of bluish gray rectangular beads. I think that the rectangular beads will add rigidity to the frame and the gray will help shade the frame into the proposed gray background. As I bead around, I attach any figure that butts the frame.


I have decided to leave the upper left corner to last. This is where I planned the speakeasy door with the eye hole. I am debating leaving this feature out as I am concerned with getting the background too busy as well as adding a detail too small (the eye in the hole) to carry down to the reduced playing card size.


Another decision is what stitch in which to actually do the background. Brick stitch will be more stiff but add lines to the background. I like to surround my brick stitch figures in a background of right angle weave as there are no distracting line of beads in right angle weave. However, right angle weave is a softer stitch, it will not be as stiff a supporting structure. Right angle weave also takes longer to stitch than brick stitch. I have chosen to do the lines of the dance floor in brick stitch and the surrounding background in right angle weave. I think that the dance floor lines will add sufficient support especially if done with rectangle beads.

I am sampling some of the brick stitch lines representing the dance floor. I may or may not decide to keep these. I do like the blue and gray, but like the gold-brassy beads less. I am concerned they might draw attention too much away from the figures. I will wait and delay my decision till more is stitched.


I have decided to do the background in right angle weave. To prepare the brick stitching for right angle weave, I do a picot row. I add a bead, pick up the thread bridge between the 2 beads below and DO NOT go through the bead a second time. This allows the bead to set up with its hole perpendicular to the previous beads below in the brick stitch row. These picot beads will be incorporated into the 4 bead circles that are the basic unit of right angle weave. Joanne

Wednesday, December 9, 2009

FGP#12 Charleston Couple


Since the dark areas of the woman and man blend together, I felt it best to stop working on the woman and begin the man's figure so that the blending of the heads could be done together.

To begin the male figure, I started vertical rows of beads against the side of the female body. I then threw bead ladders in black to mark the creases in the man's pants. The pants were then filled in choosing the direction of the bead rows to follow the drape of the clothing fabric.


The woman's hand was added and the man's shirt worked up to the woman's arm.

The man's legs and shoes were completed and arm and shoulder begun.


Joanne

Tuesday, November 17, 2009

FGP#7


I've just had a vacation break cruising down the Saone and Rhone from Lyon to Avignon. Lots of rain but it didn't stop me from getting lots of good photos for future projects. However, time to get back to work on Mr. Disco. I usually start a figure somewhere in the center. Here I chose the lapel line. I do the first bead ladder only an inch or two at a time, shape it by adding a second row, then continue. If the original bead ladder is too long, it becomes difficult to properly shape it. I then decided to start a second piece working form the second lapel. I repeated the blue on blue striping of the Swing dancer's bodice in the leisure suit vest of the Disco dancer and joined the 2 pieces.

Arms and jacket were executed in a manner similar to that described for the Swing Dancers. I decided to start the hair as a bead ladder circle and add other circles of beads to provide a more hairlike texture. I am using #8 Fireline for my thread. It comes in crystal (white) and smoke (black). I do switch thread color--using the crystal for light beads and smoke for dark beads. Again, I find it easier to establish the outer edges of the figure and then fill in the center. I am constantly measuring the growing figure against the photo collage for shape, size and direction of lines. I do this as often as every bead and if a bead doesn't fit, I remove it before going on. It is very easy to get off pattern without this constant checking.